KTransformers部署DeepSeek-R1
1.项目定位
这是一项由清华大学团队提出的,可以在模型运行过程中灵活的将专家模型加载到CPU上、同时将MLA/KVCache卸载到GPU上,从而深度挖掘硬件性能,实现更低的显存运行更大尺寸的模型。
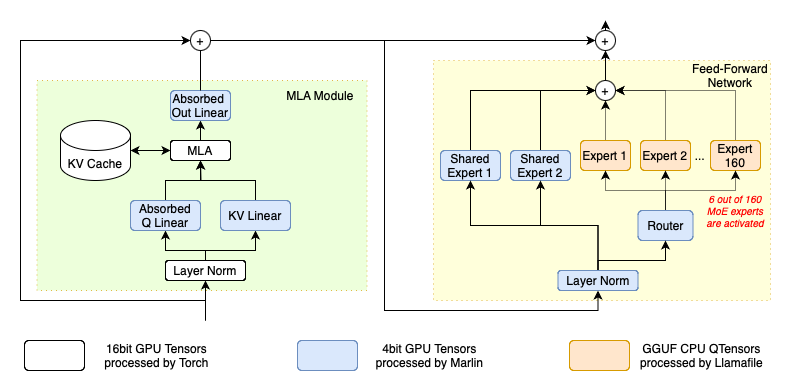
该技术目前的实践效果,可以实现480G内存+13G显存(长尺寸输出或多并发时达到20G显存),即可运行DeepSeek R1 Q_4_K_M量化版模型(类似INT4量化),并且响应速度能够达到15token/s。大幅降低了传统DeepSeek R1 INT4模型的运行门槛。这也是目前最具价值的DeepSeek R1高性能部署方案。
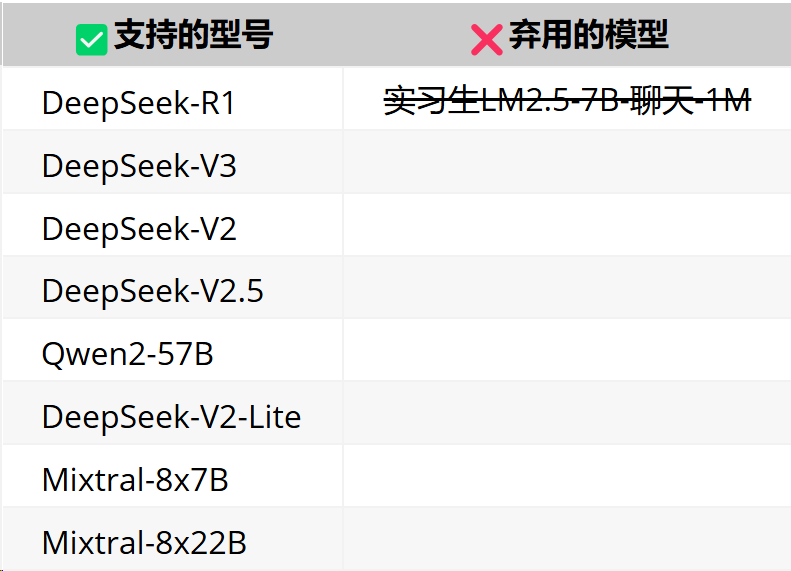
支持的型号包括:
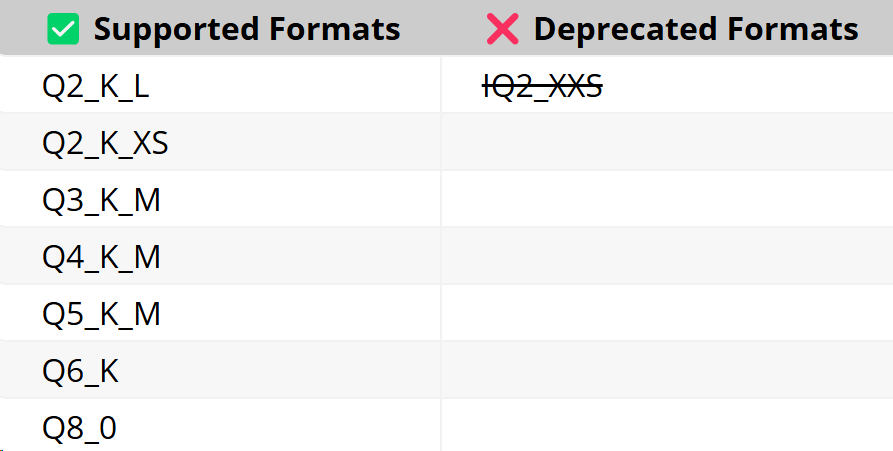
支持量化格式:
支持配置:

2.硬件配置说明
GPU:RTX 4090(24GB)
CPU:64 vCPU Intel (R) Xeon (R) Gold 6454S
内存:512G(至少需要400G)
硬盘:1T SSD(实际使用需要400G左右)
3.准备环境
CUDA 12.1 及以上版本,如果您还没有,您可以从这里安装。
带有 gcc、g++ 和 cmake 的 Linux-x86_64(以 Ubuntu 为例)
sudo apt-get update
sudo apt-get install build-essential cmake ninja-build
建议使用Miniconda3或Anaconda3创建一个 Python=3.11 的虚拟环境来运行我们的程序。应该确保 Anaconda 使用的 GNU C++ 标准库的版本标识符包括
GLIBCXX-3.4.32conda create --name ktransformers python=3.11 conda activate ktransformers # you may need to run ‘conda init’ and reopen shell first conda install -c conda-forge libstdcxx-ng # Anaconda provides a package called `libstdcxx-ng` that includes a newer version of `libstdc++`, which can be installed via `conda-forge`. strings ~/anaconda3/envs/ktransformers-0.3/lib/libstdc++.so.6 | grep GLIBCXX
确保已安装 PyTorch、packaging、ninja 您还可以安装以前版本的 PyTorch
pip3 install torch torchvision torchaudio --index-url https://download.pytorch.org/whl/cu126
pip3 install packaging ninja cpufeature numpy
同时你需要从https://github.com/Dao-AILab/flash-attention/releases下载并安装相应版本的flash-attention。
4.安装
如果您想使用 numa 支持,您不仅需要设置 USE_NUMA=1,而且还需要确保您已经安装了 libnuma-dev(sudo apt-get install libnuma-dev可能会对您有帮助)。
下载源码并编译:
初始化源代码
git clone https://github.com/kvcache-ai/ktransformers.git
cd ktransformers
git submodule init
git submodule update
[可选] 如果要使用网站运行,请在执行前编译网站
bash install.sh对于简单安装:
bash install.sh对于拥有两个 CPU 和 1T RAM 的用户:
 # Make sure your system has dual sockets and double size RAM than the model's size (e.g. 1T RAM for 512G model)
 apt install libnuma-dev
 export USE_NUMA=1
 bash install.sh # or #make dev_install
5.本地聊天
下载地址
魔搭社区下载地址:https://www.modelscope.cn/models/unsloth/DeepSeek-R1-GGUF
HuggingFace下载地址:https://huggingface.co/unsloth/DeepSeek-R1-GGUF
运行示例
# Begin from root of your cloned repo!
# Begin from root of your cloned repo!!
# Begin from root of your cloned repo!!!

# Download mzwing/DeepSeek-V2-Lite-Chat-GGUF from huggingface
mkdir DeepSeek-V2-Lite-Chat-GGUF
cd DeepSeek-V2-Lite-Chat-GGUF

wget https://huggingface.co/mradermacher/DeepSeek-V2-Lite-GGUF/resolve/main/DeepSeek-V2-Lite.Q4_K_M.gguf -O DeepSeek-V2-Lite-Chat.Q4_K_M.gguf

cd .. # Move to repo's root dir

# Start local chat
python -m ktransformers.local_chat --model_path deepseek-ai/DeepSeek-V2-Lite-Chat --gguf_path ./DeepSeek-V2-Lite-Chat-GGUF

# If you see “OSError: We couldn't connect to 'https://huggingface.co' to load this file”, try:
# GIT_LFS_SKIP_SMUDGE=1 git clone https://huggingface.co/deepseek-ai/DeepSeek-V2-Lite
# python  ktransformers.local_chat --model_path ./DeepSeek-V2-Lite --gguf_path ./DeepSee
它具有以下论点:
--model_path(必填):模型名称(例如“deepseek-ai/DeepSeek-V2-Lite-Chat”,它将自动从Hugging Face下载配置)。或者,如果您已经获得本地文件,您可以直接使用该路径来初始化模型。注意:目录中不需要.safetensors文件。我们只需要配置文件来构建模型和 tokenizer。
--gguf_path(必填):包含可从Hugging Face下载的 GGUF 文件的目录路径。请注意,该目录应仅包含当前模型的 GGUF,这意味着每个模型都需要一个单独的目录。--optimize_config_path预先编写了两个规则文件,用于优化 DeepSeek-V2 和 Qwen2-57B-A14 这两个 SOTA MoE 模型。--max_new_tokens:Int(默认值=1000)。要生成的新令牌的最大数量。--cpu_infer:Int(默认值=10)。用于推理的 CPU 数量。理想情况下应设置为(核心总数 - 2)。
Qwen2-57B
pip install flash_attn # For Qwen2

mkdir Qwen2-57B-GGUF && cd Qwen2-57B-GGUF

wget https://huggingface.co/Qwen/Qwen2-57B-A14B-Instruct-GGUF/resolve/main/qwen2-57b-a14b-instruct-q4_k_m.gguf?download=true -O qwen2-57b-a14b-instruct-q4_k_m.gguf

cd ..

python -m ktransformers.local_chat --model_name Qwen/Qwen2-57B-A14B-Instruct --gguf_path ./Qwen2-57B-GGUF

# If you see “OSError: We couldn't connect to 'https://huggingface.co' to load this file”, try:
# GIT_LFS_SKIP_SMUDGE=1 git clone https://huggingface.co/Qwen/Qwen2-57B-A14B-Instruct
# python  ktransformers/local_chat.py --model_path ./Qwen2-57B-A14B-Instruct --gguf_path ./DeepSeek-V2-Lite-Chat-GGUF
Deepseek-V2
mkdir DeepSeek-V2-Chat-0628-GGUF && cd DeepSeek-V2-Chat-0628-GGUF
# Download weights
wget https://huggingface.co/bartowski/DeepSeek-V2-Chat-0628-GGUF/resolve/main/DeepSeek-V2-Chat-0628-Q4_K_M/DeepSeek-V2-Chat-0628-Q4_K_M-00001-of-00004.gguf -o DeepSeek-V2-Chat-0628-Q4_K_M-00001-of-00004.gguf
wget https://huggingface.co/bartowski/DeepSeek-V2-Chat-0628-GGUF/resolve/main/DeepSeek-V2-Chat-0628-Q4_K_M/DeepSeek-V2-Chat-0628-Q4_K_M-00002-of-00004.gguf -o DeepSeek-V2-Chat-0628-Q4_K_M-00002-of-00004.gguf
wget https://huggingface.co/bartowski/DeepSeek-V2-Chat-0628-GGUF/resolve/main/DeepSeek-V2-Chat-0628-Q4_K_M/DeepSeek-V2-Chat-0628-Q4_K_M-00003-of-00004.gguf -o DeepSeek-V2-Chat-0628-Q4_K_M-00003-of-00004.gguf
wget https://huggingface.co/bartowski/DeepSeek-V2-Chat-0628-GGUF/resolve/main/DeepSeek-V2-Chat-0628-Q4_K_M/DeepSeek-V2-Chat-0628-Q4_K_M-00004-of-00004.gguf -o DeepSeek-V2-Chat-0628-Q4_K_M-00004-of-00004.gguf

cd ..

python -m ktransformers.local_chat --model_name deepseek-ai/DeepSeek-V2-Chat-0628 --gguf_path ./DeepSeek-V2-Chat-0628-GGUF

# If you see “OSError: We couldn't connect to 'https://huggingface.co' to load this file”, try:

# GIT_LFS_SKIP_SMUDGE=1 git clone https://huggingface.co/deepseek-ai/DeepSeek-V2-Chat-0628

# python -m ktransformers.local_chat --model_path ./DeepSeek-V2-Chat-0628 --gguf_path ./DeepSeek-V2-Chat-0628-GGUF
模型地址
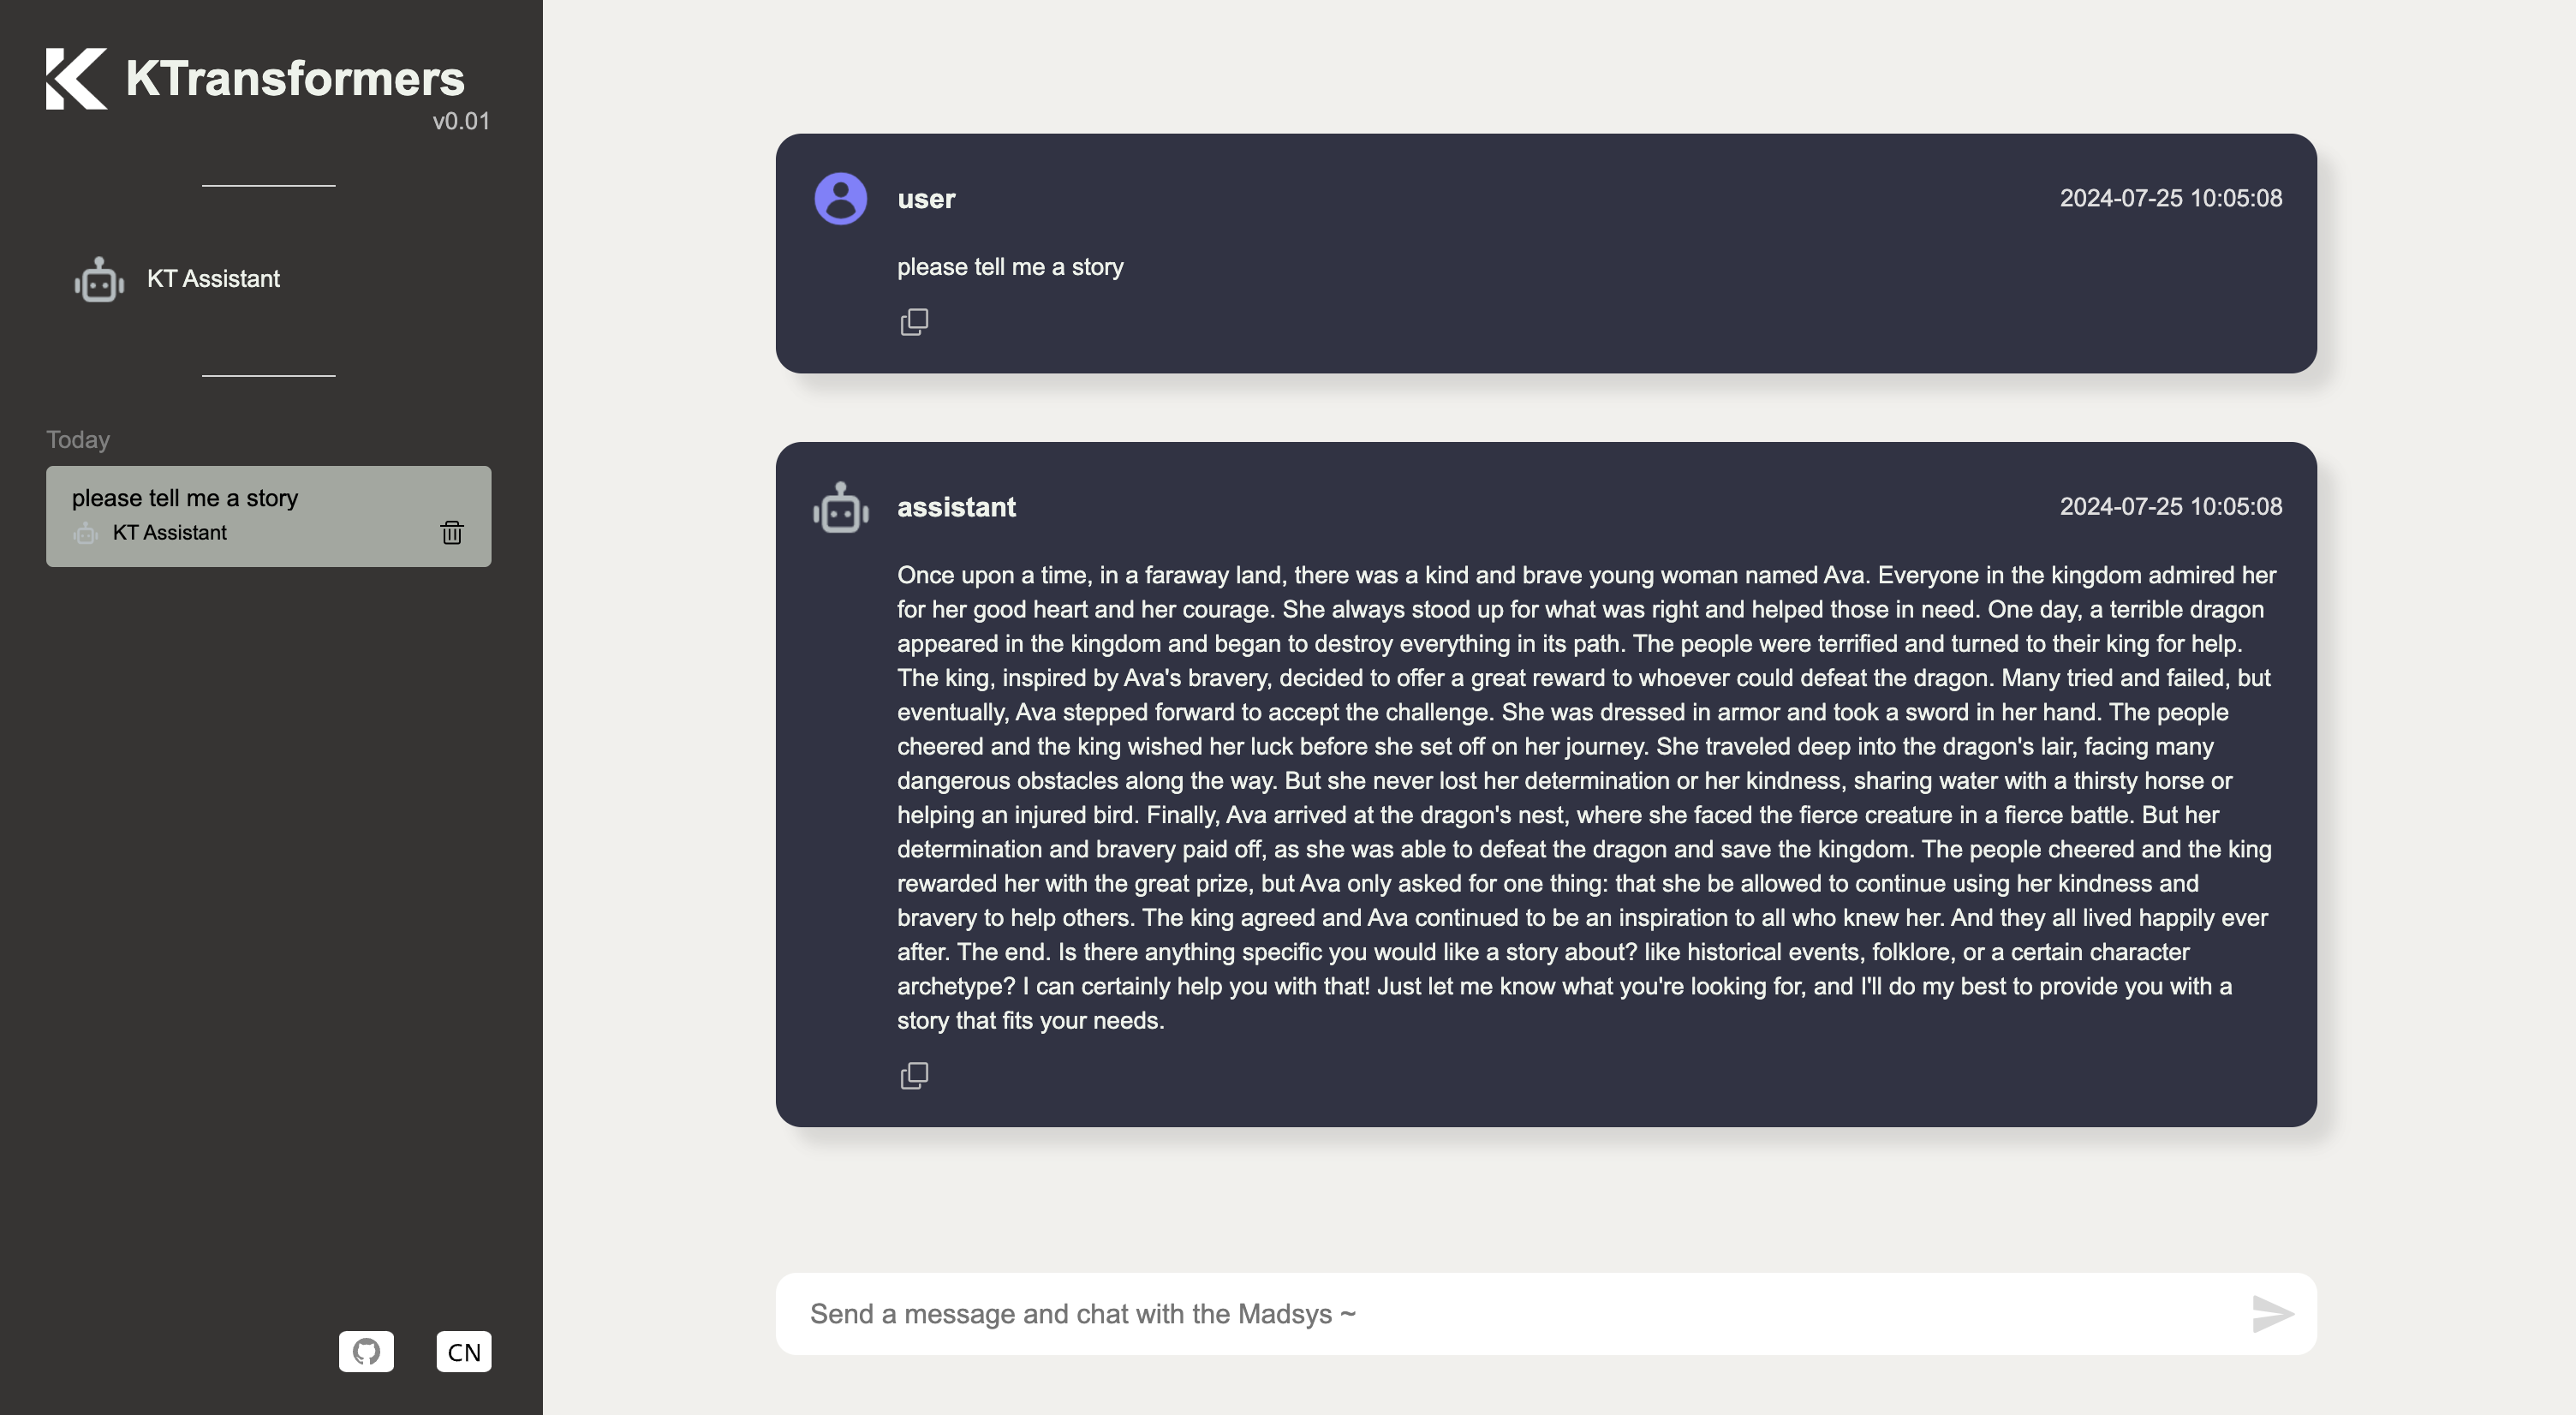
界面模型交互UI
无需网站即可开始:
ktransformers --model_path deepseek-ai/DeepSeek-V2-Lite-Chat --gguf_path /path/to/DeepSeek-V2-Lite-Chat-GGUF --port 10002从网站开始:
ktransformers --model_path deepseek-ai/DeepSeek-V2-Lite-Chat --gguf_path /path/to/DeepSeek-V2-Lite-Chat-GGUF --port 10002 --web True或者你想用 transformers 启动服务器,model_path 应该包含 safetensors
ktransformers --type transformers --model_path /mnt/data/model/Qwen2-0.5B-Instruct --port 10002 --web True访问网址为http://localhost:10002/web/index.html#/chat 的网站:
0